I've decided to start making youtube tutorials :)
First up is a percussion tutorial for Ableton. Using impulse. Its one of my favourite tricks.
https://www.youtube.com/watch?v=4403ObIc4yc
I'm always open for requests as well.
Tuesday, December 4, 2012

Monday, November 30, 2009
Making Bass and Kicks gel(and sidechaining them)
Here is a quick tutorial on fine tuning kicks and bass to make them sound better together, as well as how to side-chain them (in FLStudio 9)
Step 1: Route kick and bass to seperate mixer channels and assign a Parametric EQ2 in the FX slots of each. By pressing play you can see which frequencies are dominant on the kick, and now we enhance them.

Step 2: Here I have boosted certain frequencies of the kick using the EQ, notice the roll-off at each end of the spectrum. Also note that I havent rolled off the kick too early, as it still has some harmonics that are rather high, without these the kick sounded hollow.

Step 3: Line up both EQ2's so that you can compare their frequencies and press play so that you can get an idea of the frequency ranges used.

Step 4: Here I boosted the bass's frequencies AROUND the area I boosted the kick, if you boost the same areas they will conflict with each other, using this method the bass punches through the bass, resulting in a nice solid thump. 
Step 1: Route kick and bass to seperate mixer channels and assign a Parametric EQ2 in the FX slots of each. By pressing play you can see which frequencies are dominant on the kick, and now we enhance them.

Step 2: Here I have boosted certain frequencies of the kick using the EQ, notice the roll-off at each end of the spectrum. Also note that I havent rolled off the kick too early, as it still has some harmonics that are rather high, without these the kick sounded hollow.

Step 3: Line up both EQ2's so that you can compare their frequencies and press play so that you can get an idea of the frequency ranges used.

Step 4: Here I boosted the bass's frequencies AROUND the area I boosted the kick, if you boost the same areas they will conflict with each other, using this method the bass punches through the bass, resulting in a nice solid thump.
Notice the early roll-off on the bass's EQ, for this example I only wanted to use low end harmonics so that you can hear the difference easily.

Step 5: To sidechain the bass with the kick, select the kicks mixer channel, the instead of routing it to the basses channel, you right click on the bass channel routing button and select "side chain to this track)
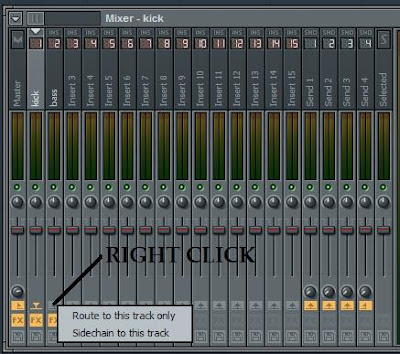
Step 6: Apply a Fruity Limiter to the bass channel, there are now three simple steps left

1: Select compression instead of limiting

Step 6: Apply a Fruity Limiter to the bass channel, there are now three simple steps left

1: Select compression instead of limiting
2: Select the channel to be sidechained from
3: Adjust the gain/threshold/ratio limits
Simply adjust the levels till u can notice the bass starting to pump around the kicks.
You can also adjust the attack and release levels to fine tune the effect.
An awesome tip for bass
Here I'm going to show you a very simple trick for getting much better control over your basslines.
Basically, what this entails is routing your bass channel to two seperate mixer channels, with one being dedicated to the highs of the bass, and the other for the lows.
Step 1: Route your bass to a mixer channel - label it "Bass MAIN"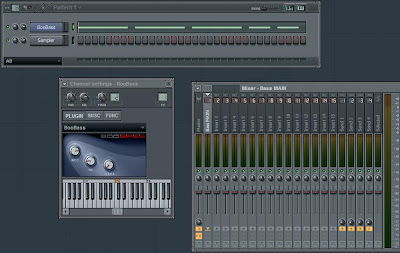
Step 2: Route that mixer channel to two seperate mixer channels. Label them Bass L and Bass H
Step 3: Un-route your main bass chanel from the master channel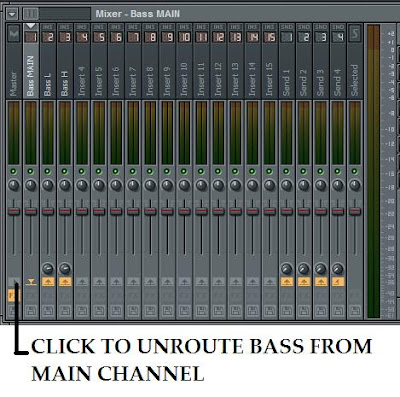
Step 4: On the "Bass L" channel, roll off everything over 150Hz on the EQ

Step 5: On the "Bass H" channel, roll off everything under 150Hz on the EQ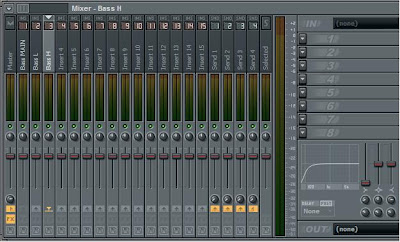
In the below pic i have muted both Bass L and H, and you can see that the Bass MAIN channel is still playing, however because it isnt routed to the master channel no sound is playing.

And thats all there is to it, you now have super fine control over your bass, however if you want to apply distortion, reverb, compression, etc, you still apply it in the Bass MAIN channel and it applies to both channels, however if you only want reverb or distortion on the highs, then you only apply it to that channel.
Simple :D
Tuesday, October 20, 2009
Simple Hip Hop Beats
Here I'm going to give a simple example of a Hip Hop beat.
Where dance music uses a simple 4/4 pattern for the kicks, in hip hop, the beats are usually around the 1/3 mark.
Snares are also usually around the 2/4 mark.
The reason I say "usually" is that this is a good place to start, however its minor variations that give it its groove.
The first example I am going to show is a simple 1/3, 2/4 pattern.
You'll notice that the highhats are not quite rythmic, just to give it a bit of a shuffle feel.

Make another clone, and some more minor changes....
 You now have 3 variations of the same beat, which is a good enough start.
The next step is the bassline, here I am just going to use a generic bassline, note though that the bassline is 4 bars long, while the beat itself is only 1 bar long.
Also note that I havent laid the bassline down in the step sequencer, I have used the top part usually resererved for samples. The only reason for this is that it now shows the actual notes in the step sequencer, so it gives kind of a visual clue as too what is happening.

Next up we give it a simple piano riff. What I have done here is just create a simple pattern, using a chord on every beat, the first bar is in C, and in the second bar i've moved the pattern up so its root note is D.
Also the scale I've used is the melodic minor, and the chords are made up of the 1,3,5 notes.
A regular I, III, V chord. Simple but effective.
Where dance music uses a simple 4/4 pattern for the kicks, in hip hop, the beats are usually around the 1/3 mark.
Snares are also usually around the 2/4 mark.
The reason I say "usually" is that this is a good place to start, however its minor variations that give it its groove.
The first example I am going to show is a simple 1/3, 2/4 pattern.
You'll notice that the highhats are not quite rythmic, just to give it a bit of a shuffle feel.

Now we are going to use that exact same template, just give it a minor variation.
Make another clone, and some more minor changes....
You now have 3 variations of the same beat, which is a good enough start.The next step is the bassline, here I am just going to use a generic bassline, note though that the bassline is 4 bars long, while the beat itself is only 1 bar long.
Also note that I havent laid the bassline down in the step sequencer, I have used the top part usually resererved for samples. The only reason for this is that it now shows the actual notes in the step sequencer, so it gives kind of a visual clue as too what is happening.
Next up we give it a simple piano riff. What I have done here is just create a simple pattern, using a chord on every beat, the first bar is in C, and in the second bar i've moved the pattern up so its root note is D.
Also the scale I've used is the melodic minor, and the chords are made up of the 1,3,5 notes.
A regular I, III, V chord. Simple but effective.
 Now just to show how using the chord helper can make your melodies sound better, if you listen to that 2bar sequence as it is now, it will sound ok. However in the second bar, the top note of the chord is not correct anymore, resulting in a sound that is a bit "off"
In the example below, I have used the chord helper to show the complete scale for a harmonic minor in C(first bar) and in D(second bar). Using the scale as a guide, you will notice that in the 2nd bar, the top notes of the chord are not actually falling on the roots fifth, and need to be moved up by one half step, as I have done here.

With the chord progression now fixed, you can remove the scale markers, leaving just the piano riff. This Riff is now a C-D progression.
The last step is the simplest. A ride on the first step of every bar.
 Notice the extra note in the 4th bar? That is just there to give it a bit of flair. All that does is lock 4 bars into a rhythm.
And that is that. A very simple hip hop beat.
Monday, October 19, 2009
Chords and Scales
Here we are going to look at scales, and how they tie into chord progression and as usual, try to keep it as simple as possible.


 Also note the velocity window for the complete chord, i have turned the volume right down.
Now I simply lowered the velocity on the half notes, just to give it a bit of variation in the notes.

 What you now have to do is move the melody up, so that its root note is the C#, then using the complete chord as a guideline, make sure that none of the notes fall out of the scale.

In this example I am going to show how to create a melody to a specific scale and then how to apply chord progression to that melody.
So to start, we open up the piano roll by right clicking on the instrment in the pattern editor
Now click on the arrow in the top left corner of the piano roll, and open the Chords list.
In this example I am going to use the Phrygian scale, its actually used quite alot in pystrance.
Although as you can see from the list below, there are more than enough to choose from.
What this tool does is Assist you by showing you the complete scale of a specifc Chord.
By simply placing a note on the C, you will see the it lays down the pattern of the complete chord for you. The Phygian scale uses 1,2,4,6,9,11 and in this example we will be working in C
Now we are going to use that as a guide line to create a simple melody using the Phyrgian scale.
Move that chord all the way over to just before the 5th step, then using it as a guide, place random notes starting with the C in the first step on every 1st and 3rd step of each bar.
Also note the velocity window for the complete chord, i have turned the volume right down.This will stop it from playing, because it always sounds horrible. Also the reason why i have placed it just before 5th step, is because this is a 4 bar melody, and this allows it to loops properly.
Now the next step is to place some half notes on the 2nd and 4th step of each bar.
Now I simply lowered the velocity on the half notes, just to give it a bit of variation in the notes.
And then I added a simple half note after every full note(would be nice with an arp)
And there you have it. A simple melody in C using the Phrygian scale.
Now the matter of chord progression comes up. To make it more interesting to the listener and also to create emotion, chord progressions do wonders.
Basically what this is is the exact same melody, but with a different root note.
In the example above, the root note is C, so now we are going to use a progression from C to C Sharp.
In the diagram below you will notice a few things.
Firstly, I have changed the display on the piano roll to show the actual notes instead of the keys, this is purely to show the notes better to make this example easier to understand.
Secondly, I have simply copied and pasted the melody into the next four bars.
Thirdly, I again use the chord helper to place the complete chord, however this time I have placed it on C#.
What you now have to do is move the melody up, so that its root note is the C#, then using the complete chord as a guideline, make sure that none of the notes fall out of the scale.There are times when you will need to re-arrange notes though, for example if you swop from a major scale to a minor.
But for this example we simply shift everything up by one note.
You will notice that the 2nd half of the melody now uses notes that were not included in the scale for the first half. Thats because our melody has now shifted from a C to a C# root note.
This is actually still within the Phrygian scale, so if you wanted to you could use the chord progression of C-C#-D#-C# and you would then have a melody that spanned 32 bars.
And there you have it. Chords and Scales made easy(I hope)
Wednesday, October 14, 2009
Automations Made Easy
Automations are much simpler than most people realise. And they are an invaluable tool.
The applications are endless, and you are only really limited by your own creativity.
For this example I have used the Fruity DX10.
It is easier to automate a FL native vst than any others, simply because you can right click on a FL native knob and it will give you the option to create automation clips.
Step 1: Create a pattern and lay it down

Step 2: Create automation clip
To choose the length of the automation, hold in CTRL and drag along the time section of the playlist editor. Now simply adjust the knob that you want to automate (Modulation one coarse envelope in this case). Open the drop down menu, select "Last Tweaked Parameter" -> "Create Automation Clip".

Step 3: Define the automation in the playlist window.

Pay attention to the "Init song in this position" option. This will make sure the song also starts with that knob in that position.
An Example: In this example I have used a pad and an acid noise. Basically we are going to automate the volume level of the pad, using fruity balance, to duck out and come back in everytime the acid noise plays.


Hopefully this has made automations a little bit simpler to understand.
Just remember that you can create an automation clip for any knob you can adjust.
Tuesday, October 13, 2009
ADSR Envelopes

ADSR envelopes might be daunting at first, but in reality they are very simple to understand.
Basically, the ADSR envelope determines that characteristics of the sample itself.
ADSR stands for Attack Decay Sustain Release.
The knobs underneath the display each control a certain point of the envelope.
DEL : Predelay time - this will give the sample a predelay before it starts
ATT : Attack - This is how long it takes the sample to get to full volume. an attack of zero means that the sample starts at full volume immediately.
HOLD : This is how long the note will hold for.
DEC : Decay - This determines how long it takes for the note drop to the sustain leve.
SUS : Sustain - Sustain and Decay work hand in hand. An easy way to remember it is that Decay is how long it takes, Sustain is related to the volume of the note.
REL : Release - this is simply how long the note takes to fade away completely.
Monday, October 12, 2009
A Kick
Thought I would kick off with a lil bit of advise and pointers on how to get that elusive kick.
A kick is probably the most basic element of a song, however it is far from simple.
1: To start this off, just choose a random kick that sounds close to what you need for your song, load it up and assign it to FX channel 1.

As you can see here, this bass drum has a solid kick. plenty of thump in the beginning.
2: Now, we change the ADSR envelope slightly.
All I've done here is just drop the Attack times on both the ADSR envelope and the LFO.
The simple reason for this is so that there is no "lead up" time to the beef of the kick.
It comes in at full strength straight away.

3: A quick, but often overlooked step is in the MISC tab.
Simple click on "Mono" to make sure that the sample is played back in mono mode.
Simple reason for this, the kick should be centred, and it shouldnt have phase or stereo.
It will just make it sound muddy.

4: Now we get to the fun bit.
Often kicks are layered, just to give it thump along the whole spectrum it uses.
A good example is comparing a 808 kick to a 909.
808 has that awesome low end bass, but no punch to it.
So what you could do it layer that 808 with another bassdrum just to give it that high end knock.
All I've done for this example though is clone the original bass drum.
Now just change the pitch of the sample either higher or lower a bit to change the characteristics of the kick.
Also change the volume of the samples for subtlety. eg: lower the volume on the punch drum to stop it overpowering the low frequency kick.

5: POGO!
Basically what this does is compress the waveform. If you look at the examples below, you will see that the 2nd one is slightly shorter. This is because the waveform has been compressed a bit due to the pogo effect, making the beginning "more dense".

There are two things to note here though. Firstly, use fine control on the knobs when adjusting the pogo, so hold down CTRL while adjusting the knob. Secondly, this is NOT compression, its simply a trick for changing the characteristic of a sample.
6: FX Chain:
The last step is the FX chain, this is what will give your sample its magic. For this example though, I have kept it VERY simple, and have only added a compressor and and EQ.
An important thing to remember on the FX chain is the order of FX. If you apply a reverb before the EQ, the reverb will include the frequencies that the EQ later changes. If you apply the reverb after the EQ, it will reverb it that way.
Subscribe to:
Posts (Atom)
