Thought I would kick off with a lil bit of advise and pointers on how to get that elusive kick.
A kick is probably the most basic element of a song, however it is far from simple.
1: To start this off, just choose a random kick that sounds close to what you need for your song, load it up and assign it to FX channel 1.

As you can see here, this bass drum has a solid kick. plenty of thump in the beginning.
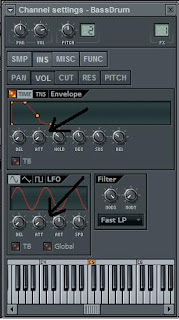
2: Now, we change the ADSR envelope slightly.
All I've done here is just drop the Attack times on both the ADSR envelope and the LFO.
The simple reason for this is so that there is no "lead up" time to the beef of the kick.
It comes in at full strength straight away.

3: A quick, but often overlooked step is in the MISC tab.
Simple click on "Mono" to make sure that the sample is played back in mono mode.
Simple reason for this, the kick should be centred, and it shouldnt have phase or stereo.
It will just make it sound muddy.

4: Now we get to the fun bit.
Often kicks are layered, just to give it thump along the whole spectrum it uses.
A good example is comparing a 808 kick to a 909.
808 has that awesome low end bass, but no punch to it.
So what you could do it layer that 808 with another bassdrum just to give it that high end knock.
All I've done for this example though is clone the original bass drum.
Now just change the pitch of the sample either higher or lower a bit to change the characteristics of the kick.
Also change the volume of the samples for subtlety. eg: lower the volume on the punch drum to stop it overpowering the low frequency kick.

5: POGO!
Basically what this does is compress the waveform. If you look at the examples below, you will see that the 2nd one is slightly shorter. This is because the waveform has been compressed a bit due to the pogo effect, making the beginning "more dense".

There are two things to note here though. Firstly, use fine control on the knobs when adjusting the pogo, so hold down CTRL while adjusting the knob. Secondly, this is NOT compression, its simply a trick for changing the characteristic of a sample.
6: FX Chain:
The last step is the FX chain, this is what will give your sample its magic. For this example though, I have kept it VERY simple, and have only added a compressor and and EQ.
An important thing to remember on the FX chain is the order of FX. If you apply a reverb before the EQ, the reverb will include the frequencies that the EQ later changes. If you apply the reverb after the EQ, it will reverb it that way.

No comments:
Post a Comment